
A sad, squishy burger bun can ruin even the most magnificent patty. Imagine golden, fluffy bread, kissed with that irresistible sourdough tang, perfectly cradling your culinary masterpiece. Making Sourdough Discard Hamburger Buns Made Easy transforms everyday ingredients and kitchen “waste” into the epic foundation your grilled creations deserve, turning humble discard into pure gold. Effortlessly use your leftover sourdough discard to create incredibly delicious, soft, and tangy burger buns, reducing waste with joy. Delight in a superior flavor profile: a subtle sourdough tang perfectly complements rich burger fillings, elevating every bite. Bake beautiful, golden-brown buns with a fluffy interior and tender crust, giving your homemade meals a professional touch. Enjoy incredible versatility; these buns are fantastic not just for burgers, but also for chicken sandwiches, pulled beef, or even as dinner rolls.
Ingredients for Sourdough Discard Hamburger Buns Made Easy
Here’s what you’ll need to make this delicious dish:
- Sourdough DiscardUse unfed discard directly from your refrigerator. This provides flavor and a slight leavening boost without the full-on sourdough commitment.
- Warm MilkWhole milk or a plant-based alternative like almond or soy milk works best to activate the yeast and enrich the dough. Ensure it’s between 105-115°F (40-46°C).
- Granulated SugarA touch of sugar feeds the yeast, aids in browning, and balances the sourdough tang. Don’t worry, the buns won’t taste sweet.
- Active Dry YeastEven with sourdough discard, a small amount of commercial yeast ensures a consistent rise and a reliably fluffy texture.
- All-Purpose FlourStandard all-purpose flour provides the right structure for soft, airy buns. You might need a little more or less depending on humidity.
- Unsalted ButterMelted and cooled butter adds richness, tenderness, and helps create a beautiful crumb structure. Use a plant-based butter for a dairy-free option.
- SaltEssential for flavor, salt also helps control yeast activity and strengthens the gluten network. Don’t skip it!
- EggOne large egg enriches the dough, contributes to a soft texture, and adds a lovely golden hue to the finished buns.
- Egg Wash (optional)A whisked egg with a splash of water or milk, brushed on top, gives the buns a beautiful sheen and helps seeds adhere.
- Sesame Seeds (optional)For that classic burger bun look and a little nutty crunch.
The full ingredients list, including measurements, is provided in the recipe card directly below.
How to Make Sourdough Discard Hamburger Buns Made Easy
Follow these simple steps to prepare this delicious dish:
Step 1: Activate the Yeast and Mix Wet Ingredients
In the bowl of a stand mixer, combine the warm milk, granulated sugar, active dry yeast, and sourdough discard. Stir gently, then let this mixture sit for 5-10 minutes until it looks slightly foamy. This confirms your yeast is active and ready to work its magic. Add the melted and cooled butter and the large egg to this bubbly mixture, whisking briefly to combine everything. This sets the stage for a rich, flavorful dough.
Step 2: Form the Dough
Attach the dough hook to your stand mixer. Gradually add the all-purpose flour and salt to the wet ingredients. Start mixing on low speed until a shaggy dough forms, then increase the speed to medium-low. Continue to knead for 8-10 minutes. The dough should become smooth, elastic, and pull away from the sides of the bowl. If it’s too sticky, add flour a tablespoon at a time; if too dry, add milk a teaspoon at a time. The goal is a supple, pliable dough that springs back when poked.
Step 3: First Rise and Divide
Lightly oil a large bowl, place the dough inside, and turn it once to coat. Cover the bowl with plastic wrap or a clean kitchen towel. Let the dough rise in a warm place for 1.5 to 2 hours, or until it has doubled in size. This crucial step develops flavor and lightness. Once risen, gently deflate the dough, turn it out onto a lightly floured surface, and divide it into 8 equal pieces. Each piece should weigh approximately 100-110 grams for standard-sized buns.
Step 4: Shape the Buns and Second Proof
Take each dough portion and shape it into a tight, round ball. The best technique involves cupping your hand over the dough on the counter and rotating it, applying gentle pressure to create surface tension. Arrange the shaped buns on a baking sheet lined with parchment paper, leaving enough space between them for expansion. Cover the buns loosely with plastic wrap or a towel and let them rise again in a warm spot for another 45-60 minutes, or until they look visibly puffy and light. Preheat your oven to 375°F (190°C) during the last 15 minutes of proofing.
Step 5: Bake to Golden Perfection
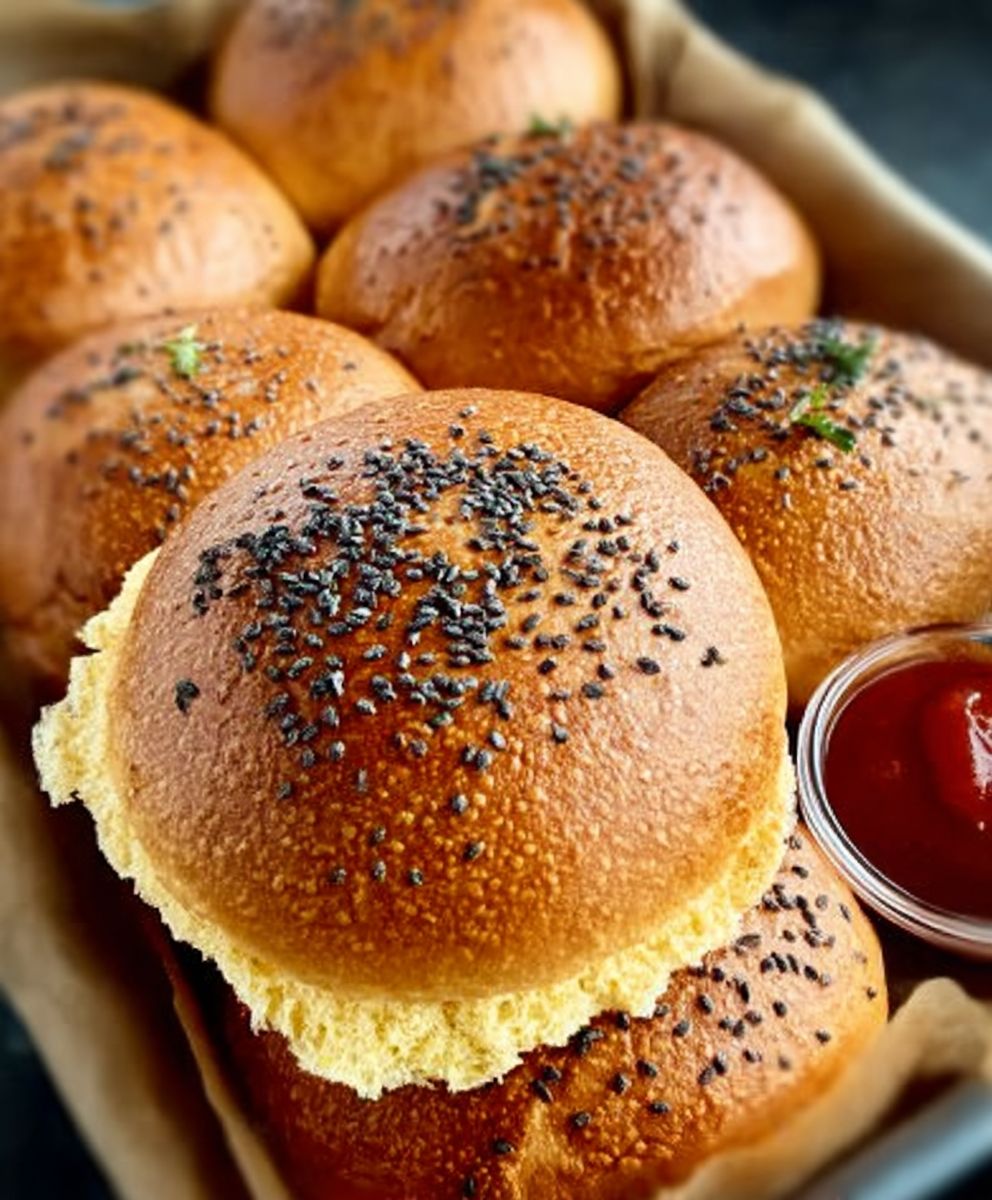
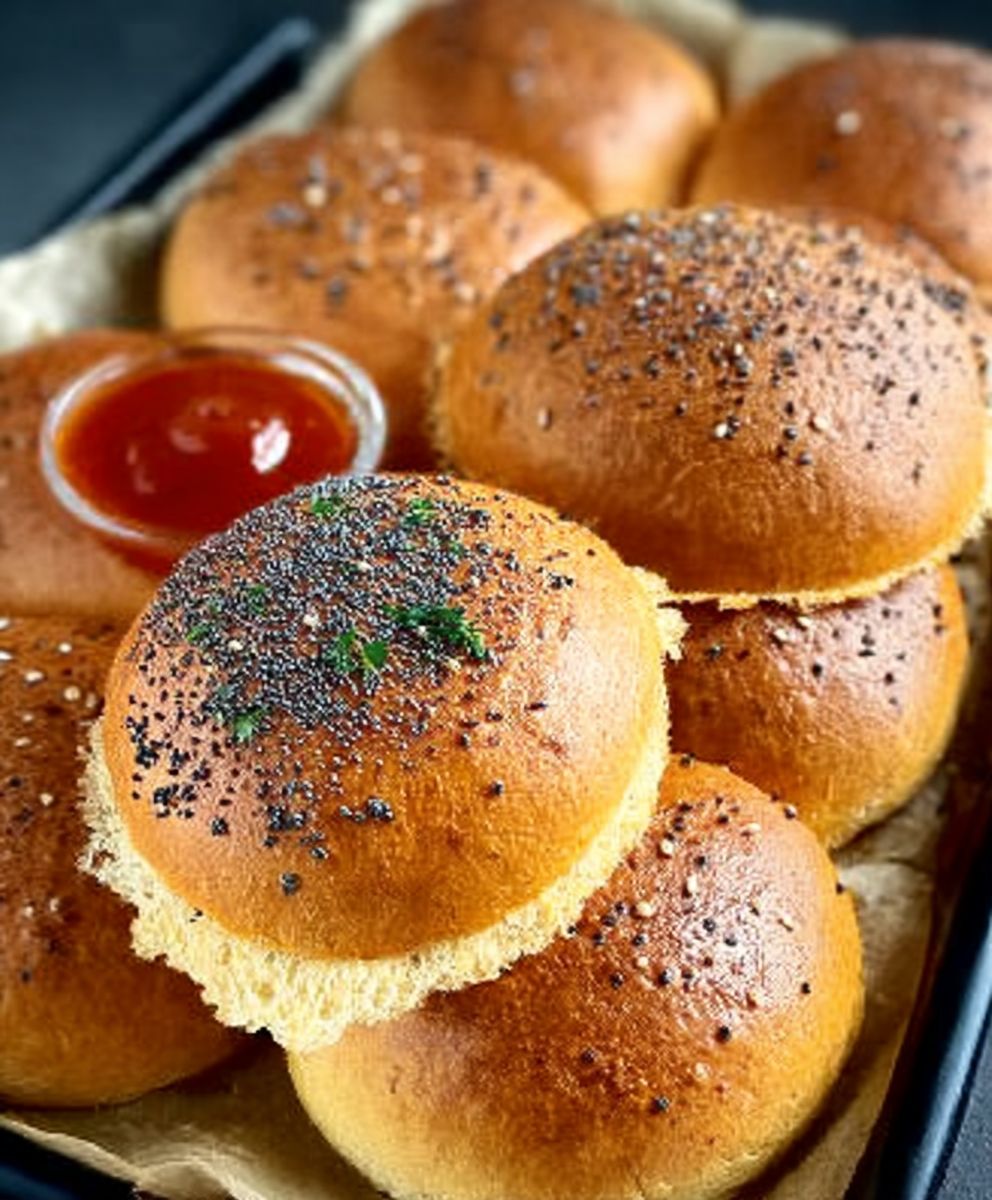
Just before baking, gently brush the tops of the proofed buns with an egg wash (if using) and sprinkle with sesame seeds for a classic finish. Bake for 15-20 minutes, or until the buns are deep golden brown and sound hollow when tapped on the bottom. If they’re browning too quickly, you can loosely tent them with foil. Allow the buns to cool completely on a wire rack before slicing. Transfer to plates and drizzle with sauce for the perfect finishing touch.
The Undeniable Charm of Sourdough Discard
There’s a quiet revolution happening in kitchens around the globe, spurred by a simple, yet ingenious act: using sourdough discard. For years, I nurtured my sourdough starter, pouring out perfectly good “discard” with a twinge of guilt. It felt like tossing away potential, a tiny culinary crime. Then, a friend enlightened me with tales of tangy pancakes, crispy crackers, and, yes, the most incredible hamburger buns. It was a revelation! The discard, far from being waste, was a secret ingredient, a flavor enhancer waiting for its moment in the spotlight. It offers a subtle complexity, a depth that store-bought buns can only dream of. Imagine that characteristic sourdough tang, not overpowering, but rather a sophisticated whisper, elevating your burger experience. This isn’t just about reducing waste; it’s about unlocking a whole new dimension of taste and texture in your home baking.
Why Your Discard Deserves a Second Chance
Sourdough discard, which is simply unfed sourdough starter, brings a lot to the table, even if it lacks the full leavening power of an active starter. First and foremost, it’s a fantastic way to minimize food waste. Instead of discarding it, you transform it into something delicious. Beyond sustainability, discard imparts a wonderful, nuanced flavor. It introduces a mild acidity and a depth of taste that enhances the overall profile of your baked goods. For these Sourdough Discard Hamburger Buns Made Easy, it contributes to a tender crumb and a slightly chewy crust, alongside that signature tangy note. It also adds a unique complexity that complements savory fillings beautifully, making your burgers truly stand out. Furthermore, the slight acidity from the discard can contribute to a longer shelf life for your baked goods.
Mastering the Art of the Perfect Bun
Achieving that bakery-quality bun at home isn’t as intimidating as it might seem. The secret lies in understanding a few fundamental principles of bread making, combined with a willingness to get a little flour on your hands. From mixing the ingredients to watching the dough transform, each step contributes to the final masterpiece. The beauty of baking with sourdough discard is that it’s more forgiving than working with a purely active starter, making it an excellent project for both novice and experienced bakers alike. The process is a dance between precision and intuition, but with these guidelines, you’ll be waltzing your way to fluffy perfection in no time. Embrace the journey; the reward is truly worth every effort.
Kneading Your Way to Fluffiness
Proper kneading is the cornerstone of light and airy buns. Kneading develops the gluten in the flour, creating a strong, elastic network that can trap the gases produced by the yeast. This trapped gas is what makes your buns rise and gives them their characteristic soft, open crumb. Whether you’re using a stand mixer with a dough hook or kneading by hand, the goal is the same: a smooth, pliable dough that springs back when gently poked. If kneading by hand, be patient; it can take 15-20 minutes of consistent work. You’ll know it’s ready when you can stretch a small piece of dough thinly enough to see light through it without it tearing – this is called the “windowpane test.” Don’t cut this step short, as under-kneaded dough results in dense, heavy buns.
The Proof is in the Proofing
Proofing is where the magic truly happens. This is the fermentation stage where yeast consumes sugars and releases carbon dioxide, causing the dough to rise. There are two main proofing stages for these Sourdough Discard Hamburger Buns Made Easy: the bulk ferment and the final proof. The first rise, or bulk ferment, develops flavor and strength throughout the entire dough mass. The second rise, after shaping, is critical for achieving the final light texture and volume. Find a warm, draft-free spot for proofing; a slightly warmed oven (turned off!) or a sunny kitchen counter works well. Don’t rush proofing, but also don’t overproof. Overproofed dough can collapse in the oven, leading to a dense texture. Look for dough that is visibly puffy and jiggles slightly when gently shaken.
Beyond Burgers: Creative Applications
While “hamburger buns” is in the name, limiting these delightful Sourdough Discard Hamburger Buns Made Easy to just burgers would be a culinary tragedy! Their soft texture, subtle tang, and sturdy structure make them incredibly versatile. Think beyond the classic patty and consider them as a canvas for a myriad of delicious fillings. These buns can elevate any meal, transforming everyday leftovers into gourmet experiences. Their homemade charm also makes them a fantastic addition to any family gathering or picnic, showcasing your baking prowess. Experiment with different toppings or glazes to customize them further.
From Savory Sandwiches to Sweet Treats
These buns are not just for burgers. Imagine them split and toasted, filled with juicy pulled chicken, slow-cooked lamb, or thinly sliced grilled steak and cheese for an incredible sandwich experience. They are perfect for sloppy joe nights or even as a base for open-faced melts. For a lighter touch, use them for breakfast sandwiches with scrambled eggs and turkey sausage. And here’s a secret: they can even lean sweet! Lightly toast them, spread with a rich fruit spread or chocolate-hazelnut spread, and enjoy a surprisingly delicious snack. The sourdough tang complements both savory and sweet profiles, proving these discard buns are truly multi-talented.
Troubleshooting Common Bun Blunders
Even experienced bakers face challenges, and homemade buns are no exception. Don’t let a few bumps in the road deter you from achieving perfect Sourdough Discard Hamburger Buns Made Easy. Understanding common pitfalls and how to correct them will empower you to bake with confidence. Baking is as much an art as it is a science, and sometimes the smallest adjustments can make the biggest difference. The key is to pay attention to your dough and learn its language, responding to its needs as you go.
Why Your Buns are Dense
If your buns turned out dense, several factors might be at play. One common culprit is insufficient kneading. If the gluten network isn’t properly developed, the dough won’t trap gases effectively, leading to a heavy crumb. Another reason could be under or over-proofing. Underproofed dough hasn’t had enough time for the yeast to create enough gas, while overproofed dough can collapse, losing its airy structure. The temperature of your milk also matters; if it’s too hot, it kills the yeast, and if too cold, it slows it down too much. Always ensure your yeast is active before adding flour. Lastly, adding too much flour can result in a stiff, dry dough that won’t rise properly. Be precise with measurements and adjust sparingly.
Avoiding the “Hockey Puck” Syndrome
Nobody wants a hockey puck posing as a hamburger bun! To avoid this unfortunate outcome, pay close attention to the shaping process. After dividing the dough, shaping each piece into a tight, smooth ball with good surface tension is crucial. This helps the bun hold its shape and rise evenly. Ensure your second proof is adequate; the buns should look visibly puffy. A final rise in a warm, humid environment helps prevent a dry exterior that could hinder oven spring. Also, make sure your oven is preheated to the correct temperature. A hot oven creates a burst of steam and rapid rise, often called “oven spring,” which contributes significantly to a light texture. Don’t open the oven door too early, as this can cause temperature fluctuations that negatively impact the rise.
Storing and Enjoying Your Homemade Treasures
Congratulations, you’ve made incredible Sourdough Discard Hamburger Buns Made Easy! Now, how do you keep them fresh and delicious for as long as possible? Proper storage is key to extending their life and ensuring you can enjoy them throughout the week. These buns are at their absolute best within the first day or two of baking, when they are softest and most flavorful. However, with the right techniques, you can savor their homemade goodness for several days, or even weeks if you plan to freeze them. For short-term storage, allow the buns to cool completely on a wire rack before placing them in an airtight container or a large resealable bag. Store them at room temperature for up to 3-4 days. For longer storage, you can freeze the baked and cooled buns. Wrap each bun individually in plastic wrap, then place them together in a freezer-safe bag. They will keep well in the freezer for up to 2-3 months. To enjoy from frozen, simply thaw at room temperature or warm gently in a microwave or oven. A quick toast can revive their texture beautifully, bringing back that lovely crisp exterior.
Frequently Asked Questions About Sourdough Discard Hamburger Buns Made Easy
Can I use active sourdough starter instead of discard?
Yes, you can use active sourdough starter, but you might need to adjust the liquid slightly. Active starter has a different hydration level and leavening power. For best results with this recipe, unfed discard is recommended.
How long do these buns stay fresh?
When stored in an airtight container at room temperature, your Sourdough Discard Hamburger Buns Made Easy will stay wonderfully fresh and soft for 3-4 days. For optimal freshness, consider freezing any buns you don’t plan to eat immediately.
Can I freeze the buns?
Absolutely! These buns freeze beautifully. Once fully cooled, wrap each bun individually in plastic wrap and then place them in a freezer-safe bag. They will keep well in the freezer for up to 2-3 months. Thaw at room temperature or gently warm.
What if I don’t have a stand mixer?
No problem! You can absolutely knead the dough by hand. The process will take a bit longer, typically 15-20 minutes, to achieve the desired elasticity. Just be prepared for a good arm workout!
Perfecting the Cooking Process
To ensure your Sourdough Discard Hamburger Buns Made Easy turn out perfectly fluffy, prioritize efficiency. Begin by warming your milk, then mix the wet ingredients thoroughly before adding dry ones. Knead the dough until smooth and elastic, allowing ample time for the bulk fermentation and subsequent proofing to develop superior texture and flavor.
Add Your Touch
Feel free to customize these delightful buns! Swap regular flour for a mix of bread and whole wheat for a nuttier flavor. Try brushing the tops with melted plant-based butter or a light egg wash before baking. For a savory twist, sprinkle sesame seeds, poppy seeds, or even a dash of garlic powder on top before baking.
Storing & Reheating
Once cooled completely, store your Sourdough Discard Hamburger Buns Made Easy in an airtight container at room temperature for up to 3 days, or freeze them for up to 2 months. To reheat, thaw frozen buns first, then warm in a preheated oven at 300°F (150°C) for 5-7 minutes, or briefly toast for optimal freshness.
Ah, the humble hamburger bun! Often an afterthought, yet undeniably the unsung hero of any burger feast. For too long, we’ve settled for bland, flimsy excuses for bread, relegating our juicy patties and gourmet toppings to second-class citizenship. But no more, my friends! Today, we embark on a delicious adventure, transforming that often-neglected sourdough discard into something truly spectacular: homemade burger buns so good, they might just steal the show. Get ready to elevate your burger game, because mastering Sourdough Discard Hamburger Buns Made Easy is about to become your proudest kitchen achievement.
A Culinary Journey to Amazing Buns
Let’s be honest, we’ve all been there. You diligently feed your sourdough starter, watch it bubble and thrive, then dutifully pour off the discard, feeling a pang of guilt. It’s like throwing away perfectly good potential! But what if I told you that discard holds the secret to the fluffiest, most flavorful hamburger buns you’ve ever tasted? It’s true! This isn’t just about reducing waste; it’s about unlocking a whole new level of homemade deliciousness. The slight tang from the sourdough adds a depth of flavor that store-bought buns can only dream of, making every bite an experience.
Why Sourdough Discard Buns? Oh, The Fluff!
Beyond the noble act of saving your discard from the drain, these easy sourdough buns offer a host of irresistible benefits. Firstly, the flavor! That subtle sourdough tang plays wonderfully with rich burger patties and fresh toppings. Secondly, the texture! We’re talking about an ethereal lightness combined with a satisfying chew. They hold up to even the juiciest burger without dissolving into a soggy mess, yet remain incredibly soft. And thirdly, the sheer satisfaction of pulling a tray of golden, perfectly domed buns from your own oven. Your family and friends will marvel, and you, my friend, will simply smile, knowing your secret weapon was once considered “waste.” These homemade burger rolls are a game-changer.
Gather Your Tools and Treasures: Ingredients for Sourdough Discard Hamburger Buns Made Easy
Before we dive into the delightful mess of dough, let’s ensure our kitchen is stocked. This recipe is wonderfully straightforward, requiring mostly pantry staples. You won’t need any exotic ingredients, just a willingness to get a little flour on your hands and a healthy dose of enthusiasm. The beauty of these discard burger buns lies in their simplicity and the incredible results they yield.
The Pantry Line-Up
- 1 cup (240g) fed or unfed sourdough discard (straight from the fridge is fine!)
- 1/2 cup (120ml) warm milk (any kind works, including plant-based options)
- 1/4 cup (50g) granulated sugar
- 1 large egg, lightly beaten
- 1/4 cup (56g) unsalted butter, melted and slightly cooled
- 3 cups (360g) all-purpose flour, plus more for dusting
- 1 teaspoon salt
- 1 tablespoon active dry yeast
- Optional: Egg wash (1 egg beaten with 1 tbsp water or milk) and sesame seeds for topping
Whisking Up Magic: Step-by-Step Guide
Alright, apron on, sleeves rolled up, and let’s get baking! Don’t be intimidated; making Sourdough Discard Hamburger Buns Made Easy is far less complicated than it sounds. Think of it as a fun, therapeutic activity that ends with truly spectacular bread. We’ll break it down into manageable, joyful steps.
Mixing the Dough: The Sticky Beginning
- In a large mixing bowl, combine the warm milk, sugar, and yeast. Give it a gentle stir and let it sit for about 5-10 minutes until it looks foamy. This indicates your yeast is alive and ready to party!
- Add the sourdough discard, beaten egg, and melted butter to the yeast mixture. Whisk everything together until well combined.
- Gradually add the flour and salt to the wet ingredients. You can do this with a sturdy spoon or a stand mixer fitted with a dough hook. Mix until a shaggy dough forms.
- Turn the dough out onto a lightly floured surface. Knead for 8-10 minutes, either by hand or with your stand mixer, until the dough is smooth, elastic, and no longer overly sticky. It should pass the “windowpane test” – meaning you can stretch a small piece thin enough to see light through it without tearing. This is crucial for fluffy buns!
First Rise & Shaping: Patience is a Virtue (and Delicious)
- Lightly grease a clean bowl with a touch of oil. Place the dough in the bowl, turning it once to coat. Cover the bowl with plastic wrap or a damp kitchen towel.
- Let the dough rise in a warm place for 1.5 to 2 hours, or until it has doubled in size. This is the bulk fermentation where flavor really develops. Don’t rush it!
- Once risen, gently punch down the dough to release the air. Turn it out onto a lightly floured surface.
- Divide the dough into 8-12 equal pieces, depending on your desired bun size. For classic hamburger buns, 8 pieces usually work well.
- Shape each piece into a tight, smooth ball. The trick here is to create surface tension by tucking the edges underneath and rolling it against the counter. This gives your buns that beautiful, round shape.
The Final Proof and Bake: The Grand Finale
- Arrange the shaped dough balls on a baking sheet lined with parchment paper, leaving enough space between them for expansion.
- Cover the baking sheet loosely with plastic wrap or a damp towel and let the buns proof for another 45-60 minutes in a warm spot, or until they look visibly puffy and light. They should be almost doubled in size again.
- Preheat your oven to 375°F (190°C) about halfway through the final proofing.
- If desired, gently brush the tops of the proofed buns with an egg wash and sprinkle with sesame seeds.
- Bake for 15-20 minutes, or until the buns are golden brown and sound hollow when tapped on the bottom.
- Transfer the baked buns to a wire rack to cool completely. Resist the urge to tear into them immediately (I know, it’s hard!). Cooling allows the interior structure to set properly.
-
Don’t skip the windowpane test:Ensuring your dough is properly kneaded is key for fluffy, soft buns. This elasticity prevents dense, tough bread.
-
Embrace a warm spot for rising:A slightly warm oven (turned off!) or a sunny window can significantly help your dough rise consistently and efficiently.
-
Cool completely before slicing:Patience truly pays off. Slicing warm buns can compress their delicate structure, making them appear dense.
I remember the first time I made these sourdough discard hamburger buns. My partner, a notorious critic of all things bread-related, took one bite and simply declared, “Okay, this changes everything.” That’s the magic these buns bring!
Troubleshooting Your Bun-tastic Adventures
Even the most seasoned baker encounters a hiccup or two. Don’t worry if your first batch isn’t picture-perfect. Baking is a learning process, and making Sourdough Discard Hamburger Buns Made Easy is no exception. Here are a few common issues and how to tackle them with grace and a smile.
When Buns Don’t Rise: A Dough-lemma
If your buns seem a bit sluggish, consider the temperature of your ingredients. Cold milk or a chilly kitchen can slow yeast activity considerably. Ensure your milk is warm (not hot!) and find a cozy, draft-free spot for your dough to proof. Also, double-check your yeast’s expiration date; old yeast is a party pooper.
Too Dense? Let’s Lighten Up!
Dense buns usually point to either insufficient kneading or under-proofing. Kneading develops gluten, which gives the buns their airy structure. If you didn’t knead long enough, the gluten won’t be strong enough to trap the gases produced by the yeast. Similarly, if you didn’t let them rise enough, the yeast didn’t have time to produce those glorious air pockets. Give your dough the time and love it deserves!
Frequently Asked Questions About Sourdough Discard Hamburger Buns
You’ve got questions, and I’ve got answers! Let’s clear up any lingering doubts about these fantastic homemade burger rolls so you can bake with confidence.
Can I use active sourdough starter instead of discard?
While this recipe specifically utilizes discard, you can absolutely use active sourdough starter. Just be aware that the rise times might be slightly faster, so keep a closer eye on your dough during proofing.
How long do these buns stay fresh?
Stored in an airtight container at room temperature, these Sourdough Discard Hamburger Buns Made Easy stay wonderfully fresh and soft for up to 3 days. After that, they’re still great toasted!
Can I make these buns ahead of time and freeze them?
Absolutely! Once baked and completely cooled, place the buns in a freezer-safe bag or container. They can be frozen for up to 2 months. Thaw at room temperature or in the refrigerator overnight before use.
What’s the best way to get a golden-brown top?
For that irresistible golden-brown crust, an egg wash (one egg beaten with a tablespoon of water or milk) brushed gently over the buns just before baking is your secret weapon. It also helps those sesame seeds stick beautifully!
Your Bun-believable Journey Awaits!
And there you have it – the complete guide to making Sourdough Discard Hamburger Buns Made Easy. You’ve transformed simple ingredients and neglected discard into magnificent, fluffy canvases for your culinary creations. Imagine the next family barbecue, the weekend burger night, or even just a quick sandwich, elevated by these homemade beauties. The aroma alone will have everyone lining up! So go forth, bake with joy, and prepare to be crowned the bun monarch of your kitchen kingdom. Your taste buds, and your burgers, will thank you.
Conclusion for Sourdough Discard Hamburger Buns Made Easy
Embrace the joy of turning your bubbly sourdough discard into something truly spectacular with these Sourdough Discard Hamburger Buns Made Easy. We’ve journeyed through the simple steps, answered your burning questions, and hopefully inspired a little kitchen confidence. Imagine the look on your family’s faces when you present a towering burger, perfectly nestled in a soft, homemade bun you crafted yourself. No more sad, store-bought buns! These easy-to-make, flavorful buns are a game-changer for any meal, proving that even kitchen “waste” can be transformed into pure culinary gold. Get baking, and prepare for endless compliments!
PrintSourdough Discard Hamburger Buns Made Easy

Turn discard into divine! Get soft, airy, lightly tangy hamburger buns easily. This recipe uses active yeast for a guaranteed rise and perfectly kneaded dough.
- Prep Time: 15 minutes
- Cook Time: 20 minutes
- Total Time: 35 minutes
- Yield: 4 servings
- Method: Stovetop
- Cuisine: American
Ingredients
- Sourdough DiscardUse unfed discard directly from your refrigerator. This provides flavor and a slight leavening boost without the full-on sourdough commitment.
- Warm MilkWhole milk or a plant-based alternative like almond or soy milk works best to activate the yeast and enrich the dough. Ensure it's between 105-115°F (40-46°C).
- Granulated SugarA touch of sugar feeds the yeast, aids in browning, and balances the sourdough tang. Don't worry, the buns won't taste sweet.
- Active Dry YeastEven with sourdough discard, a small amount of commercial yeast ensures a consistent rise and a reliably fluffy texture.
- All-Purpose FlourStandard all-purpose flour provides the right structure for soft, airy buns. You might need a little more or less depending on humidity.
- Unsalted ButterMelted and cooled butter adds richness, tenderness, and helps create a beautiful crumb structure. Use a plant-based butter for a dairy-free option.
- SaltEssential for flavor, salt also helps control yeast activity and strengthens the gluten network. Don't skip it!
- EggOne large egg enriches the dough, contributes to a soft texture, and adds a lovely golden hue to the finished buns.
- Egg Wash (optional)A whisked egg with a splash of water or milk, brushed on top, gives the buns a beautiful sheen and helps seeds adhere.
- Sesame Seeds (optional)For that classic burger bun look and a little nutty crunch.
Instructions
- Step 1: Activate the Yeast and Mix Wet IngredientsIn the bowl of a stand mixer, combine the warm milk, granulated sugar, active dry yeast, and sourdough discard. Stir gently, then let this mixture sit for 5-10 minutes until it looks slightly foamy. This confirms your yeast is active and ready to work its magic. Add the melted and cooled butter and the large egg to this bubbly mixture, whisking briefly to combine everything. This sets the stage for a rich, flavorful dough.
- Step 2: Form the DoughAttach the dough hook to your stand mixer. Gradually add the all-purpose flour and salt to the wet ingredients. Start mixing on low speed until a shaggy dough forms, then increase the speed to medium-low. Continue to knead for 8-10 minutes. The dough should become smooth, elastic, and pull away from the sides of the bowl. If it’s too sticky, add flour a tablespoon at a time; if too dry, add milk a teaspoon at a time. The goal is a supple, pliable dough that springs back when poked.
- Step 3: First Rise and DivideLightly oil a large bowl, place the dough inside, and turn it once to coat. Cover the bowl with plastic wrap or a clean kitchen towel. Let the dough rise in a warm place for 1.5 to 2 hours, or until it has doubled in size. This crucial step develops flavor and lightness. Once risen, gently deflate the dough, turn it out onto a lightly floured surface, and divide it into 8 equal pieces. Each piece should weigh approximately 100-110 grams for standard-sized buns.
- Step 4: Shape the Buns and Second ProofTake each dough portion and shape it into a tight, round ball. The best technique involves cupping your hand over the dough on the counter and rotating it, applying gentle pressure to create surface tension. Arrange the shaped buns on a baking sheet lined with parchment paper, leaving enough space between them for expansion. Cover the buns loosely with plastic wrap or a towel and let them rise again in a warm spot for another 45-60 minutes, or until they look visibly puffy and light. Preheat your oven to 375°F (190°C) during the last 15 minutes of proofing.
- Step 5: Bake to Golden PerfectionJust before baking, gently brush the tops of the proofed buns with an egg wash (if using) and sprinkle with sesame seeds for a classic finish. Bake for 15-20 minutes, or until the buns are deep golden brown and sound hollow when tapped on the bottom. If they're browning too quickly, you can loosely tent them with foil. Allow the buns to cool completely on a wire rack before slicing. Transfer to plates and drizzle with sauce for the perfect finishing touch.
Notes
- Keep your cooled buns fresh by storing them in an airtight container at room temperature for up to 3 days, or freeze them for longer enjoyment—they thaw beautifully!
- To bring back that fresh-baked warmth, lightly toast sliced buns, or for whole buns, warm them gently in a 300°F (150°C) oven for 5-7 minutes.
- Beyond classic hamburgers, these delightfully soft and subtly tangy buns are incredible for pulled chicken, chicken salad sandwiches, or even as a base for a gourmet breakfast sandwich.
- Achieving that perfect fluffy texture relies on proper kneading; keep going until your dough is smooth, elastic, and springs back readily when gently pressed, which is key for a great crumb.
Nutrition
- Serving Size: 1 bun
- Calories: 262
- Sodium: 288mg
- Fat: 8g
- Saturated Fat: 4.3g
- Trans Fat: 0.1g
- Protein: 5g
FAQs
How long do Sourdough Discard Hamburger Buns Made Easy stay fresh?
Once you’ve whipped up these delightful Sourdough Discard Hamburger Buns Made Easy, they’re typically at their peak for 2-3 days when stored correctly at room temperature. Think of them like a good friend; they’re best when fresh! To keep them happy and soft, place them in an airtight container or a sealed plastic bag. If you’re not planning a burger feast right away, consider freezing them for longer enjoyment. Just remember, the fresher they are, the more perfectly they’ll cradle your delicious burger creations.
Can I freeze my Sourdough Discard Hamburger Buns Made Easy?
Absolutely! Freezing these wonderful Sourdough Discard Hamburger Buns Made Easy is a fantastic idea for meal prep or if you find yourself with an abundance. Once the buns are completely cooled, seal them tightly in a freezer-safe bag, ensuring as much air is removed as possible to prevent freezer burn. They can happily chill in the freezer for up to 2-3 months. When you’re ready for burger night, simply pull out the desired number of buns and let them thaw at room temperature, or give them a quick toast for that freshly baked feel.
What’s the best way to ensure my homemade discard buns rise perfectly?
Ah, the magic of the rise! The secret to perfect, fluffy discard buns lies in warmth and patience. Ensure your kitchen is a cozy environment, ideally around 70-75°F (21-24°C). Place your dough in a lightly oiled bowl, cover it with plastic wrap or a damp towel, and let it rise in a draft-free spot. An oven with the light on (but not heated!) can be a great proofing box. Remember, sourdough works on its own timetable, so don’t rush it. A slow, steady rise builds amazing flavor and texture.
Can I add seeds to these delicious hamburger buns?
You most certainly can, and we heartily encourage it for an extra layer of flavor and texture! Once you’ve shaped your Sourdough Discard Hamburger Buns Made Easy and they’re ready for their final proofing, simply brush the tops with a little milk, water, or a plant-based alternative. Then, generously sprinkle your favorite seeds – sesame, poppy, or a “everything bagel” blend – right on top. The liquid helps them adhere during baking. Not only does this add a delightful crunch, but it also gives your homemade buns a professional, bakery-worthy finish.


Leave a Comment